Minecraft offers boundless opportunities for creation, and few projects capture the imagination quite like building your own formidable fortress. If you’ve ever dreamed of a safe haven, a grand statement, or a functional base against the pixelated wilderness, then diving into Step-by-Step Minecraft Small Castle Tutorials is your next great adventure. Forget sprawling, intimidating behemoths for a moment; we're focusing on accessible, epic small castles that are both achievable and incredibly rewarding.
This guide isn't just about placing blocks; it's about strategizing, designing, and bringing a vision to life, all while keeping those pesky Creepers and Zombies at bay. Ready to construct a stronghold that’s uniquely yours?
At a Glance: Your Castle-Building Cheat Sheet
- Sketch with Dirt: Always outline your castle on the ground using dirt first. It's your easily erasable blueprint.
- Mix Your Blocks: Avoid monotone walls. Combine Stone Bricks, Cobblestone, Andesite, and wood for realistic texture.
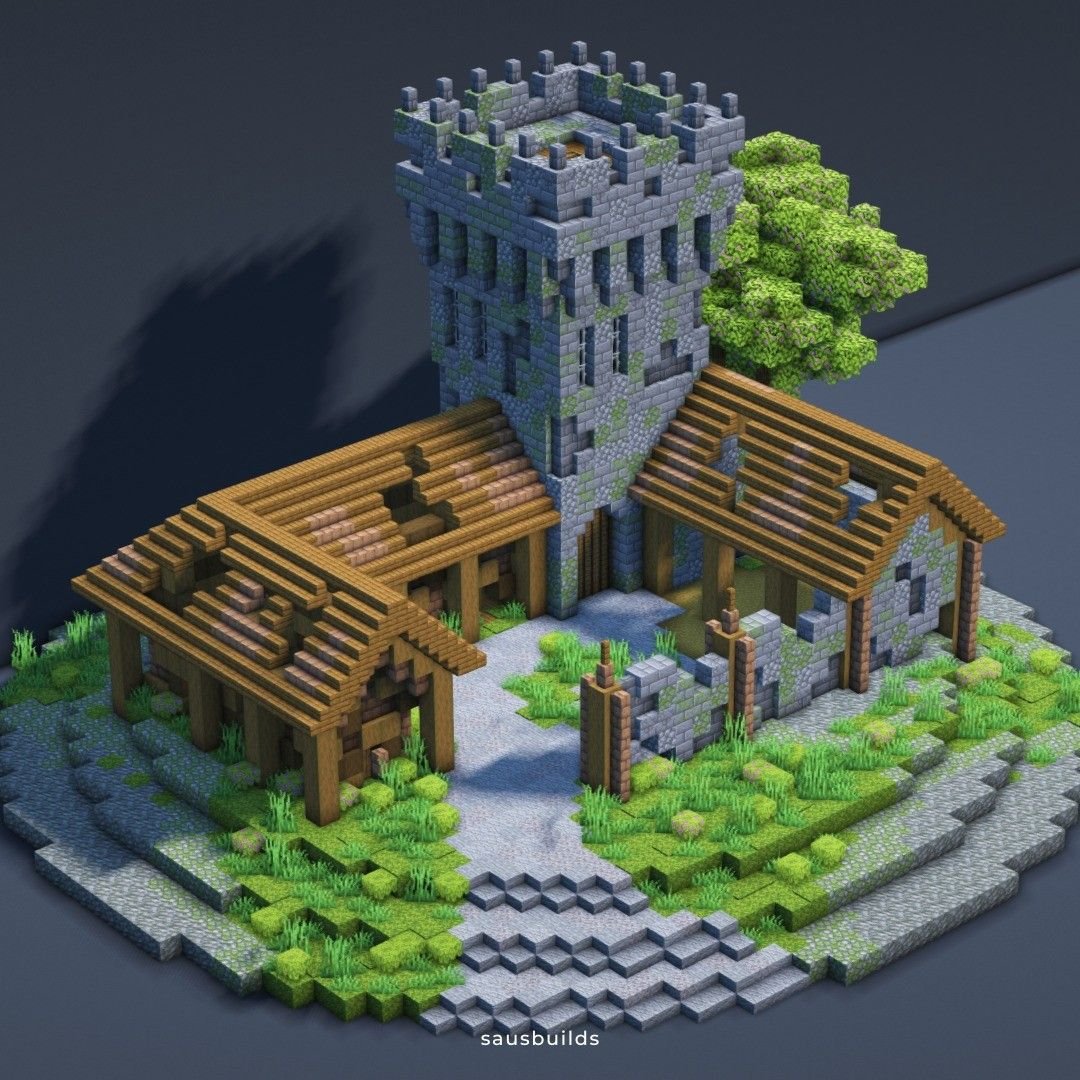
- Add Depth: Walls aren't flat! Add pillars that jut out, and use stairs to create curves at the top and bottom.
- Light It Up: Darkness is where monsters spawn. Use lanterns, campfires, or hidden glowstone to keep your castle safe.
- Stop Spiders: Create a "lip" at the top of your walls—a block sticking out—to prevent spiders from climbing over.
- Embrace the Landscape: Integrate natural hills, rivers, or valleys into your design for a more visually impactful build.
- Start Small: Your first castle can be a simple 5-block high square with a single tower. You can always expand!
Why Build a Castle? More Than Just Stone Walls
In Minecraft, a castle serves two crucial roles: it's a magnificent aesthetic centerpiece and an impenetrable shield for your precious treasures. Beyond mere function, building a castle hones your creativity, problem-solving skills, and resource management. It's a statement, a sanctuary, and often, the heart of your Minecraft world. Whether you're in Survival mode battling the elements or flexing your architectural muscles in Creative, a castle project provides a rich, engaging experience.
Before You Dig: Essential Minecraft Castle Principles
Great castles aren't built on whims; they're founded on smart principles. These core ideas will guide you from the first block to the final flourish.
Plan Your Layout with Dirt Blocks
Think of dirt as your pencil and the ground as your sketchpad. Before you commit valuable stone, use dirt blocks to map out your castle's footprint. Want to adjust a tower's size? Extend a wall? Dirt is easily placed and removed, making it perfect for experimenting with dimensions and flow. This simple step saves countless hours of mining and rebuilding later.
Mix Blocks for Realistic Texture
A castle built entirely from one type of block can look flat and uninspired. Real-world structures show wear, age, and varied materials. Mimic this in Minecraft by combining blocks like:
- Stone Bricks: Your primary building block.
- Mossy Stone Bricks: For an ancient, overgrown feel.
- Cracked Stone Bricks: To suggest damage or age.
- Cobblestone/Andesite: Great for breaking up large sections of Stone Bricks or for foundations.
- Wood: Adds warmth and contrast, especially for details.
This "salt and pepper" approach will bring your walls to life.
Add Depth to Walls, Don't Build Them Flat
Flat walls are boring walls. To create the illusion of strength and complexity, add depth:
- Pillars: Every 3-4 blocks, extend a pillar (either stone or wood) one block outwards from your wall. This creates visual interest and structural integrity.
- Stair Detailing: Use Stone Brick Stairs at the bottom and top edges of your walls, facing outwards, to create a subtle curved, beveled look. This makes your walls feel less like simple rectangles.
Light It Up: Your Best Defense
Monsters (mobs) like zombies, skeletons, and spiders spawn in darkness. Proper lighting is your primary defense:
- Lanterns: Excellent for hanging from ceilings, walls, or atop posts. They look great and provide ample light.
- Campfires: Place these on stone blocks for a decorative light source that also produces smoke, perfect for towers.
- Hidden Glowstone/Jack o’Lanterns: If you prefer a cleaner aesthetic, hide these bright blocks under green carpets or slabs. The light still comes through, but the source is invisible.
Illuminate every corner, especially courtyards and large interior rooms, to ensure your castle remains a mob-free zone.
Stop Spiders with a "Lip"
Spiders are sneaky; they can climb flat vertical surfaces. To deter them from scaling your carefully constructed walls, add a "lip" around the very top edge. This means placing an extra block, or a slab, sticking out one block beyond the wall's top. Spiders will hit this overhang and fall, unable to overcome the obstacle.
Follow the Land: Integrate Natural Features
Don't fight the terrain; embrace it! Building a castle directly into a hillside, along a river, or atop a natural plateau can dramatically enhance its visual appeal and realism. A castle that flows with the landscape feels more organic and impressive than one plonked on perfectly flat ground.
Choosing Your Royal Vibe: Minecraft Castle Styles
Before you even place that first dirt block, consider what kind of castle speaks to your soul. Each style offers unique challenges and aesthetics.
- Classic Medieval Castle (Difficulty: 2/5): This is the quintessential fortress. Think massive stone walls, tall square towers, and a deep water moat. It's sturdy, realistic, and a fantastic starting point for many builders.
- Survival Fortress (Starter Castle) (Difficulty: 1/5): Your first mission in a new world. This is a smaller, highly functional castle focused purely on protection. Thick walls, iron doors, a central tower for scouting, and plenty of perimeter lighting are key. It’s perfect for learning the ropes.
- Fantasy Spire (Difficulty: 3/5): For the more whimsical builder. Characterized by very tall, thin, often elegant towers. You might incorporate colorful blocks like Blue Ice or End Stone, or even explore building a floating segment.
- Cinderella Castle (Difficulty: 3/5): Inspired by real-world fairytale castles like Neuschwanstein. These are magical, shimmering structures with intricate details, numerous towers, and delicate spires. It requires patience and an eye for detail.
- Floating Castle (Difficulty: 3/5): Defying gravity, this castle is suspended in the air. While most blocks don't fall (unlike sand or gravel), building one high up comes with the risk of fall damage. Scaffolding made of easily removable wool blocks (which can be burned away) is highly recommended.
- Japanese Castle (Difficulty: 4/5): A challenging but rewarding build. These castles typically sit atop natural or artificial hills and feature majestic keeps with progressively smaller, tiered roof designs. They often use a blend of stone and dark wood.
- Blackstone Castle (Difficulty: 4/5): For the adventurous and resource-rich. Constructed primarily from Blackstone, harvested from the perilous Nether biome. The dangers of the Nether make acquiring materials difficult, adding to its prestige.
- Hogwarts (Difficulty: 5/5): The ultimate challenge. A sprawling mountaintop castle, often near a lake, featuring archway bridges, massive towers, courtyards, and detailed interiors like dining halls and libraries. This project demands extensive planning and reference images.
For your first serious foray into castle building, we recommend starting with a Classic Medieval or Survival Fortress style. They provide a solid foundation of essential techniques.
Your Royal Palette: Recommended Materials for Castle Crafting
Choosing the right blocks is like picking the perfect pigments for a painting. Here's what you'll want in your inventory:
- Main Walls:
- Stone Bricks: The gold standard for a clean, classic castle look.
- Cracked Stone Bricks / Mossy Stone Bricks: Essential for adding age and texture when mixed with regular Stone Bricks.
- Cobblestone: An excellent, easy-to-gather alternative for beginner walls, especially in Survival Mode, or for texturing.
- Wood Details:
- Spruce Wood / Dark Oak Wood: Their darker tones provide a beautiful contrast to light stone walls, enhancing that ancient, medieval aesthetic. Oak can often look too bright.
- Fences/Stairs/Slabs: For crenellations, railings, and decorative touches.
- Base Blocks:
- Deepslate / Tuff: Use these darker, heavier blocks at the very bottom of your walls. They create the illusion of a strong, deep foundation, making your castle feel more grounded.
- Doors:
- Spruce Doors: Their rustic, dark appearance perfectly complements stone castles and enhances the medieval theme.
Remember, even a small castle can demand a significant amount of resources—plan for at least 10 to 15 stacks (over 600 blocks) of stone just for the basics!
Step-by-Step Castle Construction: From Blueprint to Battlement
Now, let's get building! These steps will guide you through the construction process, incorporating all the principles we've discussed.
Step 1: Laying the Blueprint: Planning Your Castle's Foundation
This is where your vision takes physical form, starting with the very ground beneath your feet.
- Choose Your Biome Wisely:
- Grassy Plains near Water: Ideal for beginners due to flat terrain, easy resource gathering, and the option for a water moat.
- Taiga: Offers abundant Spruce wood, perfect for dark accents.
- Mountains: Provide natural defensive advantages and dramatic backdrops, but building can be more challenging.
- Outline with Dirt: Grab a stack of dirt and start "drawing" your castle's footprint on the ground. This will be your primary guide.
- Begin with a simple square or rectangle (e.g., 14x14 blocks for a small fort).
- Experiment with adding circular or octagonal shapes at the corners for future towers.
- Don't be afraid to adjust; this is the purpose of the dirt outline! For more in-depth architectural advice and examples, check out our Minecraft small castle guide for advanced building techniques.
- Mix Shapes: While a simple square is a great start, incorporating different shapes (rectangles for main halls, circles for towers) adds complexity and visual interest.
- Dig Your Moat: Once your outline is set, dig a ditch around it.
- A simple moat can be 1 block deep and surround your 14x14 outline.
- You can make it deeper (2-3 blocks) and wider (2-3 blocks) for better defense.
- Fill it with water to slow down enemies, or for a more dangerous approach, fill it with lava (just be careful!).
Step 2: Raising the Walls and Mighty Towers
With your blueprint in place, it's time to build upwards.
- Establish Wall Height & Dimensions:
- Beginner Wall: Start with walls that are at least 3 blocks high. This provides basic protection.
- Standard Castle Wall: Aim for 5-7 blocks high for robust defense and a more imposing look.
- Tower Height: Towers should generally be taller than your walls, around 10-12 blocks, to offer better visibility and an impressive silhouette.
- Thickness: A simple beginner wall can be 1 block thick. For greater defense against Creepers, consider making critical sections 2 blocks thick, especially near vulnerable areas.
- Add Depth to Your Walls: As you build up, remember the principle of depth. Every 3-4 blocks horizontally, extend a pillar (either Stone Brick or Spruce Log) one block outwards. This adds a crucial element of realism and strength. At the bottom of your walls, use upside-down Stone Brick Stairs to create a base trim; at the top, use right-side-up stairs for a decorative crown.
- Construct Battlements (Crenellations): At the very top of your walls, create an "up-and-down" pattern (block, skip, block) to form battlements. This provides cover for archers (or you!) and adds that iconic castle silhouette.
- Build Your Gate:
- Leave a 2x2 block opening in your front wall for the main gate.
- Build a simple bridge (using wood planks or stone slabs) across your moat leading to this opening.
- Install two Spruce Doors in the opening. For extra security, consider adding a fence gate or a portcullis design (using pistons and iron bars later on).
- Erect Corner Towers:
- At each corner of your castle, build a tower. For a small castle, four 8x1 cobblestone towers can serve as simple observation decks.
- Make them taller than your main walls.
- Inside, install ladders (made from sticks and wood) to allow access to the top for better views and defensive positions.
Step 3: Adding Character: Castle Design and Texturing
Now for the fun part: making your castle look lived-in and legendary.
- The "Salt and Pepper" Trick: Go back to your finished walls. Randomly replace some of the clean Stone Bricks with other textures:
- Cobblestone: For a rugged, weathered look.
- Andesite: A smoother, grey block that blends well.
- Cracked Stone Bricks: Perfect for suggesting age and decay.
- Mossy Stone Bricks: Especially effective in damper biomes or if you want an ancient, overgrown feel.
This subtle variation prevents your castle from looking sterile and mass-produced. - Incorporate Greenery: Nature reclaims all.
- Place Vines on the sides of your towers and walls, letting them grow down for an ancient look.
- Use Oak Leaf blocks around the base of your castle as small bushes.
- If you're in a swamp or jungle biome, strategically place Mossy Cobblestone blocks to blend with the environment.
- Upgrade Your Lighting: Move beyond basic torches.
- Hang Lanterns from chains extending from ceilings or wall outcroppings.
- Place Campfires atop tall towers (ensuring they are on stone blocks to prevent fire spread) for atmospheric smoke signals during the day and warm light at night.
Step 4: Your Inner Sanctum: Crafting the Castle Interior
A castle isn't just about exterior grandeur; it's also a functional home.
- Design Your Throne Room:
- Place this impressive space on the ground floor, ideally near the main entrance, to welcome (or intimidate) visitors.
- Construct a grand chair using stone stairs for the seat and back, perhaps with signs on the sides for armrests.
- Use colorful banners (crafted with wool and dyes) to represent your team, kingdom, or personal colors.
- Lay a vibrant Red or Blue Wool carpet leading from the entrance directly to the throne.
- Build Your Treasure Room (Storage):
- Locate this room in a secure, possibly hidden, part of your castle.
- Stack chests high against the walls to maximize storage space.
- Use Item Frames placed on the front of chests to visually indicate their contents (e.g., a diamond sword in an item frame for weapons, a cooked steak for food, an iron pickaxe for mining tools).
- Create Your Royal Bedroom:
- The highest tower often offers the best safety and the most impressive views of your domain.
- Include a bed (crucial for setting your respawn point), chests for personal items, and perhaps a small crafting area.
- Clear Pathways: Ensure that interior hallways and rooms have clear, easily navigable pathways. Avoid clutter that can trap you or make movement difficult, especially when fleeing mobs.
- Essentials: Every functional castle needs:
- A bed (your respawn point).
- At least one furnace (for smelting).
- Ample chests (for storage).
- A crafting table (for all your crafting needs).
Step 5: Fortifying Your Kingdom: Robust Castle Defense
Even the grandest castle needs a strong defense.
- Strategic Lighting is Paramount:
- Reiterate: Every dark spot is a potential monster spawn point. Ensure your courtyards, interior rooms, and pathways are brilliantly lit.
- Consider using hidden Glowstone or Jack o’Lanterns covered with Green Carpet in key areas for discreet, effective illumination.
- The Moat: Your First Line of Defense:
- A deep ditch filled with water effectively slows down incoming enemies, allowing you to pick them off.
- A lava-filled moat offers greater danger to mobs (and careless players!), providing a stronger deterrent. Just make sure your castle walls are sufficiently thick and fireproof if using lava near wood!
- Iron Golem Guards:
- These loyal protectors are invaluable. To build one, place four Iron Blocks in a "T" shape and then a Carved Pumpkin on top.
- Iron Golems will patrol your castle grounds and aggressively attack hostile mobs like zombies, skeletons, and spiders, providing passive defense.
- Creeper Countermeasures:
- Light Up the Surroundings: Creepers, like other mobs, won't spawn in well-lit areas. Extend your lighting beyond your immediate walls.
- Use Your Moat: A moat creates a physical barrier, helping to keep Creepers away from your vulnerable walls.
- Obsidian for Critical Rooms: For highly valuable rooms (like your treasure vault), consider building critical walls from Obsidian. This block is blast-proof and will withstand even a charged Creeper explosion, though it is difficult to acquire.
Starting Small: Your First Survival Fortress
Don't feel pressured to build a colossal castle on your first try. The easiest and most practical approach for a beginner, especially in Survival Mode, is a simple Survival Fort.
Start with a modest square wall, say 14x14 blocks, built 5 blocks high using readily available Cobblestone. Add a single corner tower for your bed, crafting table, and chests. Focus on strong perimeter lighting and a basic moat. As you gather more resources and confidence, you can expand, add more towers, intricate designs, and grander interiors. Every epic castle starts with a single, well-placed block.
Your Next Adventure: Beyond the Basics
You've planned, built, decorated, and defended your small castle. But the world of Minecraft is ever-expanding, and so too can your architectural ambitions. Perhaps you'll connect your castle to a sprawling village, build a network of underground tunnels, or even try your hand at one of the more challenging styles like a Japanese Castle or a grand Floating Castle.
The most important thing is to enjoy the process, learn from each build, and let your creativity guide you. Your pixelated kingdom awaits its next grand addition. Happy building!